
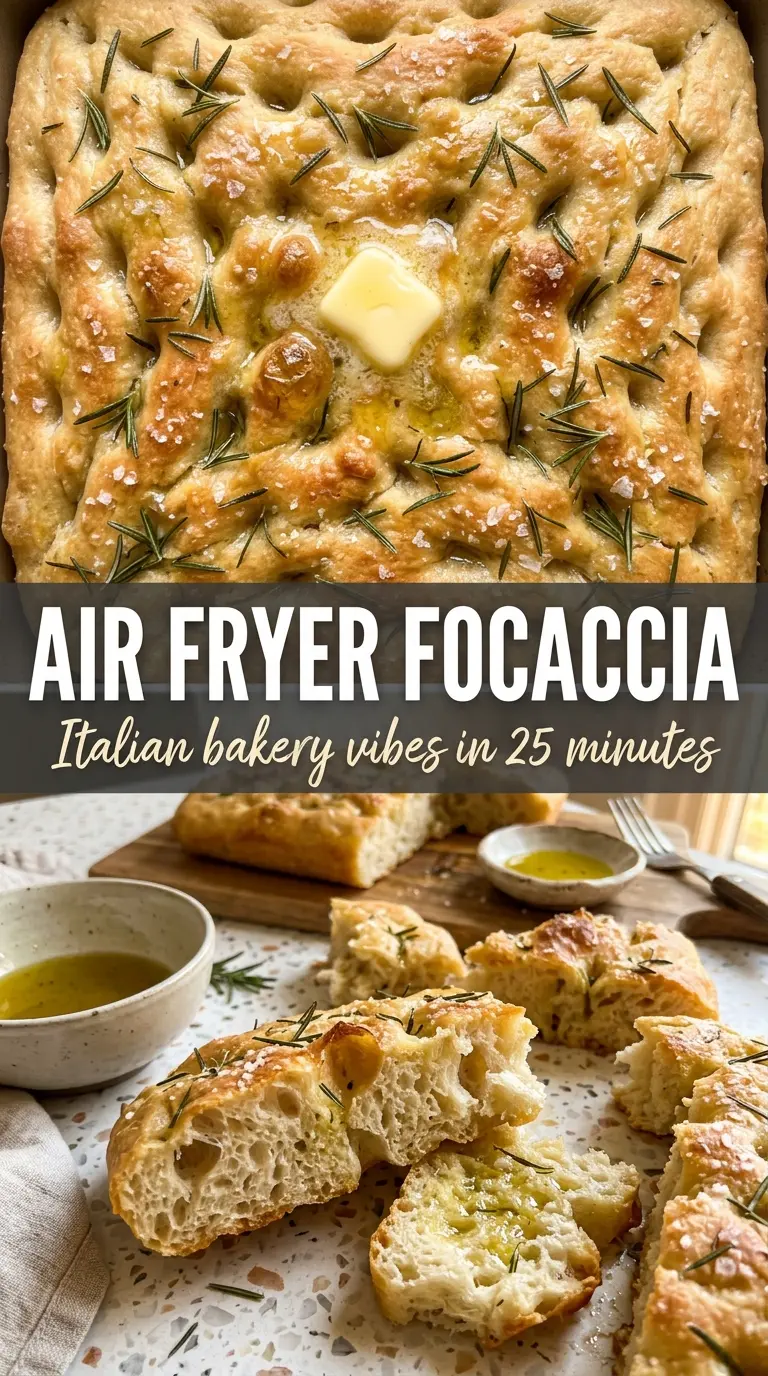
Golden, oil-shimmering air fryer focaccia has a way of disappearing fast. The edges bake up crisp and deeply browned while the center stays soft, chewy, and fragrant with rosemary and olive oil. Those little dimples aren’t just for looks either — they catch the oil and hold onto the flaky salt, which is what gives each bite that bakery-style finish.
What makes this version work is the balance of a lean dough and a generous hand with good olive oil. Instant yeast keeps the rise moving without fuss, and the dough is mixed, kneaded, and shaped with just enough structure to puff without turning bready. The air fryer handles the heat beautifully here, giving you a crackly top and a tender crumb in a fraction of the time a full oven would need.
The part worth paying attention to is the dimpling. Press deep enough that the dough holds the indentations, then don’t be shy with the oil before the rosemary and salt go on. Below, I’ve included a few practical variations, plus the small details that keep the bread from losing its airy center or baking up dry.
The dough rose nicely in the hour and the rosemary really settled into the dimples after air frying. Mine came out with crisp edges and a soft middle, and the olive oil on top made it taste like something from a bakery.
Save this air fryer rosemary focaccia for the night you want chewy bread, crispy edges, and almost no oven time.
The Reason Air Fryer Focaccia Stays Tender Instead of Drying Out
The biggest mistake with air fryer bread is treating it like a fast oven and expecting the same timing. Air fryers move a lot of hot air, which is great for browning, but it can also dry out the top before the middle has finished setting. That’s why this dough gets a full rise first and then goes into a well-oiled, parchment-lined basket where it can bake without sticking or scorching.
The other thing that matters here is thickness. If the dough is pressed too thin, it bakes into a cracker. If it’s too thick, the center stays doughy while the top gets too dark. Aim for a soft, puffy layer that fills the basket without climbing the sides too much. The dimples help control the rise, and the oil gives the bread the rich, supple texture that makes focaccia taste like focaccia.
What Each Ingredient Is Actually Doing in This Dough
- All-purpose flour — This gives you a soft, workable dough with enough structure to hold the dimples. Bread flour will make the crumb a little chewier, but all-purpose is the easiest path to a tender result.
- Instant yeast — Instant yeast mixes right into the dry ingredients, which keeps this recipe simple and dependable. If you only have active dry yeast, dissolve it in the warm water first and give it an extra 5 to 10 minutes to wake up.
- Good olive oil — This is where the flavor lives. Cheap oil will still work, but a fruity, peppery olive oil makes the bread taste richer and more finished. Don’t skimp on the amount; focaccia needs that oil to bake with a glossy top and soft interior.
- Fresh rosemary — Fresh rosemary is worth using here because it perfumes the oil as the bread bakes. Dried rosemary can taste sharp and woody, so use less if that’s all you have and crush it lightly between your fingers first.
- Flaky sea salt — The flaky salt gives you little bursts of crunch and keeps the bread from tasting flat. Fine salt in the dough seasons it from the inside, but the flaky salt on top is what makes each bite stand out.
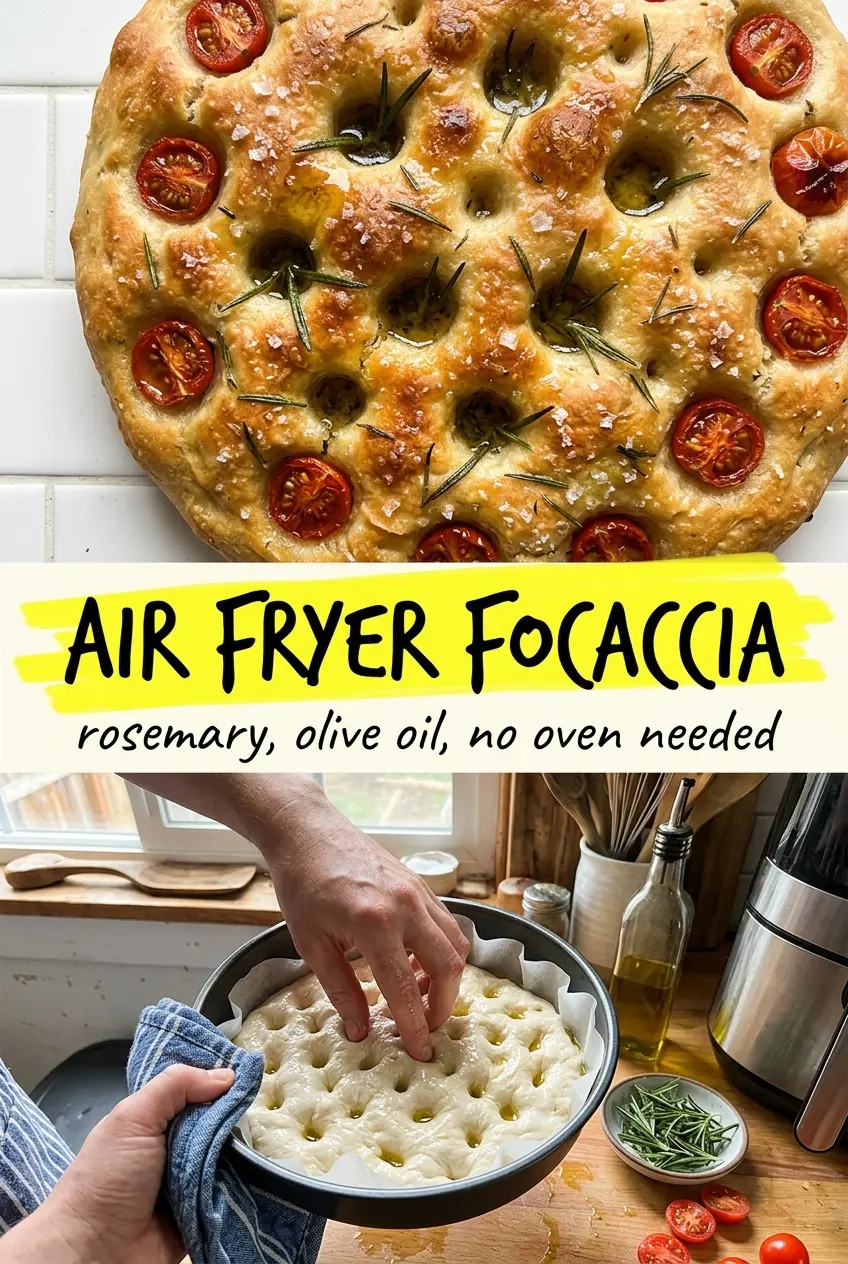
- Cherry tomatoes or olives — These are optional, but they bring moisture, brininess, and a little extra color. Press them in just before baking so they stay anchored in the dough and don’t roll around in the basket.
The Fast Rise, Deep Dimple, and Crisp Finish That Make This Bread Work
Mixing the dough without overthinking it
Stir the flour, yeast, salt, and sugar together first so everything is evenly distributed before the water goes in. Add the warm water and two tablespoons of olive oil, then mix until you have a shaggy dough with no dry flour left. If the dough looks too tight, it needs a spoonful of water; if it feels soupy, add a little flour, but resist the urge to keep fiddling once it comes together.
Developing enough structure with a short knead
Knead for about five minutes until the dough turns smooth and elastic. It won’t be as firm as sandwich bread dough, and that’s the point. The most common problem here is under-kneading, which leaves the crumb uneven and the bread flatter than it should be. After kneading, the dough should feel supple and spring back slowly when pressed.
Letting the rise do its job
Put the dough in an oiled bowl and let it rise for about an hour, or until it has doubled and looks puffed with a soft, jiggly surface. This first rise is what gives you the open, tender texture, so don’t rush it just because the air fryer is fast. If your kitchen is cool, give it a little more time rather than moving ahead early.
Pressing, dimpling, and topping with purpose
Transfer the dough to a parchment-lined air fryer basket or foil tray and press it out gently with oiled fingers. Drizzle the remaining olive oil over the surface, then dimple aggressively so the oil pools in the wells instead of sitting on top. Add the rosemary and flaky salt last, along with the tomatoes or olives if you’re using them. Shallow dimples puff back up and lose that focaccia look, so press deep enough to leave a clear impression.
Baking until the top is golden and the center sounds hollow
Air fry at 340°F for 20 to 22 minutes until the top is deeply golden and the edges look crisp. The bread should sound hollow when tapped and feel set in the center, not squishy. If the top browns too fast, reduce the heat slightly and finish the bake a minute or two longer. Let it cool for a few minutes before slicing so the crumb can settle instead of tearing.
Three Ways to Change This Air Fryer Focaccia Without Ruining the Texture
Garlic and herb version
Add finely minced garlic to the olive oil and brush it over the dough right before baking. Garlic burns fast in an air fryer, so keep it under the oil rather than scattering it on top. The result is more aromatic and savory, with a little more edge than the rosemary version.
Dairy-free, naturally vegetarian bread board base
This recipe is already dairy-free and vegetarian, which makes it easy to use as a bread board centerpiece or alongside soup and salad. Keep the olive oil generous and use the flaky salt at the end so the bread carries enough flavor on its own without butter.
Olive and tomato version
Press halved cherry tomatoes or sliced olives into the dough before baking for a more briny, juicy finish. Tomatoes add moisture and sweetness, while olives bring salt and a sharper bite. Don’t overload the surface or the center can bake unevenly; a few well-placed pieces are enough.
Storage and Reheating
- Refrigerator: Store in an airtight container for up to 3 days. The crust softens a bit in the fridge, but the bread stays pleasantly chewy.
- Freezer: Freeze slices wrapped tightly for up to 2 months. Thaw at room temperature before reheating so the inside doesn’t dry out before the center warms through.
- Reheating: Warm in the air fryer at 320°F for 3 to 5 minutes, or in a hot oven until the edges crisp again. Don’t microwave it unless you’re only after warmth, because the texture turns rubbery fast.
Answers to the Questions Worth Asking
Air Fryer Bread (Rosemary Focaccia-Style)
Ingredients
Equipment
Method
- In a bowl, mix all-purpose flour, instant yeast, salt, and sugar, then add warm water and 2 tbsp olive oil until a shaggy dough forms.
- Knead the dough for 5 minutes, then smooth it into a ball.
- Place the dough in an oiled bowl, cover, and let rise for 1 hour until visibly puffy.
- Press the dough into a parchment-lined air fryer basket or a foil tray, spreading it into an even layer.
- Drizzle with the remaining olive oil, then use oiled fingers to dimple the dough generously.
- Press chopped fresh rosemary into the dimples, sprinkle flaky sea salt, and add cherry tomatoes or olives if using.
- Air fry at 340°F for 20–22 minutes until the top is golden and sounds hollow when tapped.