
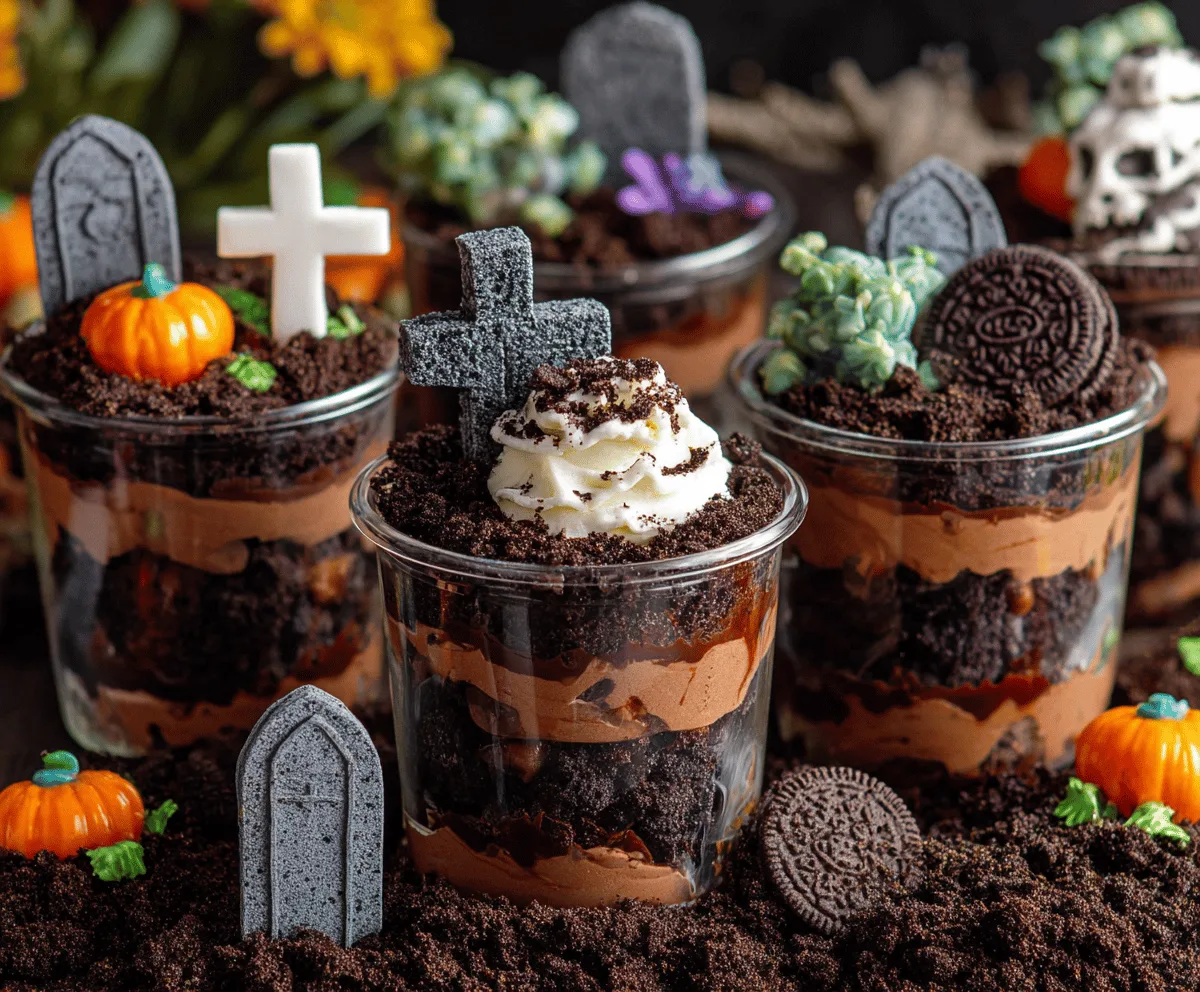
Graveyard Dirt Cups are a fun and spooky treat perfect for any Halloween party or just a playful snack. They’re made with layers of creamy chocolate pudding, crushed chocolate cookies that look like dirt, and cute little gummy worms and tombstone-shaped cookies on top. The combination of smooth pudding and crunchy cookie crumbs gives it a great mix of textures that everyone will enjoy.
I love making Graveyard Dirt Cups because they’re so easy and fun to decorate. I usually let kids help me add the gummy worms and arrange the tombstones—it makes the whole kitchen feel festive and a little messy, which is the best kind of fun. Plus, it’s always a hit with guests who get a kick out of the creepy, silly look before they dig in.
These cups are great for serving in individual portions because they look cute in clear cups and make snack time feel special. I like to serve them chilled after a spooky movie night or as a playful dessert at a Halloween get-together. They’re sure to get lots of smiles and maybe a few “eww, gross” reactions that turn into “yum!” pretty quickly.
Key Ingredients & Substitutions
Chocolate sandwich cookies: These create the “dirt” texture. Oreos work great, but you can use any chocolate cookie or gluten-free chocolate cookies if needed.
Instant chocolate pudding mix: This gives you the rich chocolate flavor and thick texture. If you prefer homemade pudding, that works too—just chill it before folding in the whipped cream.
Heavy cream: Whipping the cream adds lightness to the pudding, making the dessert fluffy and smooth. You can substitute with coconut cream for a dairy-free option.
Butter: Mixes with the cookie crumbs to help them stick together and adds richness to the “dirt” layer. You can use salted butter but reduce any added salt in your other ingredients if needed.
Halloween decorations: Plastic tombstones and candy worms are great for fun detailing. Feel free to swap for gummy bugs, mini candy pumpkins, or edible spooky shapes based on what you have.
How Do You Get the Perfect Dirt Texture for These Cups?
The cookie crumbs need to look like dirt, so texture matters. Here’s what I do:
- Use finely crushed cookies, but keep some small crumbs for variety. This gives a more realistic “dirt” feel.
- Mix crumbs with melted butter to bind them slightly—it helps the crumbs hold together but keeps the crumble texture.
- Press down the cookie crumb layers gently but don’t over-pack them; you want a loose, crumbly surface resembling fresh soil.
- Add more crumbs on top after spooning the pudding mousse—this keeps the “dirt” look on every layer and adds a crunchy texture.
These tips help your dirt cups look festive and taste great, with that perfect blend of creamy smooth and crunchy bits.
Equipment You’ll Need
- Dessert glasses or small cups – I like clear ones to show off the layers and make it look spooky.
- Mixing bowls – for preparing the cookie crumbs, pudding, and whipped cream.
- Whisk or electric mixer – makes whipping the cream quick and easy, creating a fluffy topping.
- Spoons or spatula – for folding ingredients together gently.
- Measuring cups and spoons – for accurate quantities, especially for the pudding and whipped cream.
- Decorating tools (optional) – piping bags and tips if you want to create spooky trees or designs with melted chocolate or decorating gel.
Flavor Variations & Add-Ins
- Use vanilla or caramel pudding instead of chocolate for a different flavor twist. It’s sweeter and lighter.
- Add chopped nuts or crushed pretzels to the cookie crumbs for extra crunch and saltiness.
- Incorporate mini candy pumpkins or candy corn into the “dirt” layer for a fun, colorful touch.
- Swirl in a layer of peanut butter or caramel sauce between the mousse and crumb layers for added richness. Great if you love that combo!
Graveyard Dirt Cups
Ingredients You’ll Need:
- 2 cups chocolate sandwich cookies (e.g., Oreos), finely crushed
- 3 tbsp unsalted butter, melted
- 1 package (3.9 oz) instant chocolate pudding mix
- 2 cups cold milk
- 1 cup heavy cream
- 2 tbsp powdered sugar
- 1 tsp vanilla extract
- Chocolate syrup, for drizzling
- Halloween-themed decorations: plastic tombstones, candy eyeballs or candy sprinkles, and small candy worms
- Black decorating gel or melted chocolate, to pipe a tree or spooky shapes (optional)
Time Needed
This recipe takes about 15 minutes to prepare plus at least 1 hour of chilling time in the refrigerator. The chilling helps the layers set nicely and the flavors to come together. So plan ahead for the best results!
Step-by-Step Instructions:
1. Prepare the Dirt Base:
In a bowl, mix the crushed chocolate cookies with the melted butter until the crumbs are evenly moistened. Set this mixture aside — this will be your tasty “dirt”!
2. Make the Chocolate Pudding:
In another bowl, whisk the instant chocolate pudding mix with the cold milk until thickened (about 2 minutes). Once ready, set it aside to chill a bit.
3. Whip the Cream:
Using a hand mixer or whisk, whip the heavy cream with powdered sugar and vanilla extract until you see stiff peaks. This fluffy cream will lighten up the pudding.
4. Combine Pudding and Whipped Cream:
Gently fold the whipped cream into the chocolate pudding until you get a smooth, airy mousse. Try not to deflate it — keep it light and creamy!
5. Assemble the Cups:
Start by spooning a layer of the cookie crumb “dirt” into the bottom of each cup or glass. Next, add a thick layer of the chocolate mousse.
6. Add the Top Layer:
Sprinkle another layer of the cookie crumbs over the mousse to create the top “dirt” layer. Press lightly so it stays in place but still looks crumbly.
7. Decorate:
Drizzle chocolate syrup on the inside edges of the glass to make a dripping effect. Then, place the Halloween decorations like plastic tombstones and candy worms on top. You can also pipe spooky trees with black decorating gel or melted chocolate if you like.
8. Chill and Serve:
Place the cups in the refrigerator for at least 1 hour to let everything set. Before serving, grab some small spoons and get ready for a fun, spooky treat everyone will love!
Can I Use Homemade Chocolate Pudding Instead of Instant Mix?
Absolutely! Homemade pudding works great—just be sure to chill it well before folding in the whipped cream to help the layers hold together.
Can I Make Graveyard Dirt Cups Ahead of Time?
Yes! You can assemble the cups a few hours in advance and keep them covered in the fridge. Just add any delicate decorations like candy worms right before serving to keep them fresh.
How Should I Store Leftovers?
Store any leftovers in an airtight container in the refrigerator for up to 2 days. The cookie crumbs may soften a bit over time, but the dessert will still taste delicious.
What Can I Use Instead of Chocolate Sandwich Cookies?
You can substitute with any chocolate cookies or gluten-free chocolate cookies you prefer. Just crush them finely to mimic the “dirt” texture in the cups.