
Halloween baking lands right in that sweet spot between playful and practical: the decorations do most of the work, and the recipes themselves can stay straightforward. A batch of cut-out cookies, a tray of cupcakes, or a simple cake dressed up with orange and black icing feels festive without demanding advanced decorating skills. What matters most is the base underneath the decoration. If the cookie dough holds its shape, the cake crumb stays tender, and the icing dries with a clean finish, the whole spread looks polished even when the decorating is simple.
The recipe below leans on a classic sugar-cookie style dough, which is exactly what you want for sharp Halloween shapes. Butter gives it flavor and a tender bite, while the short chill keeps the cutouts from spreading into blobs in the oven. Royal icing is the other half of the job here. It sets firm enough for outlines, floods, and stacking, so the cookies can be packaged or displayed without smudging into one another. The trick is patience at two points: chilling the dough long enough to roll cleanly and letting the icing dry completely before you move anything around.
Below, I’ve added the small details that make the decorating process less fussy, along with a few variations if you want to keep things beginner-friendly or swap in a different flavor base.
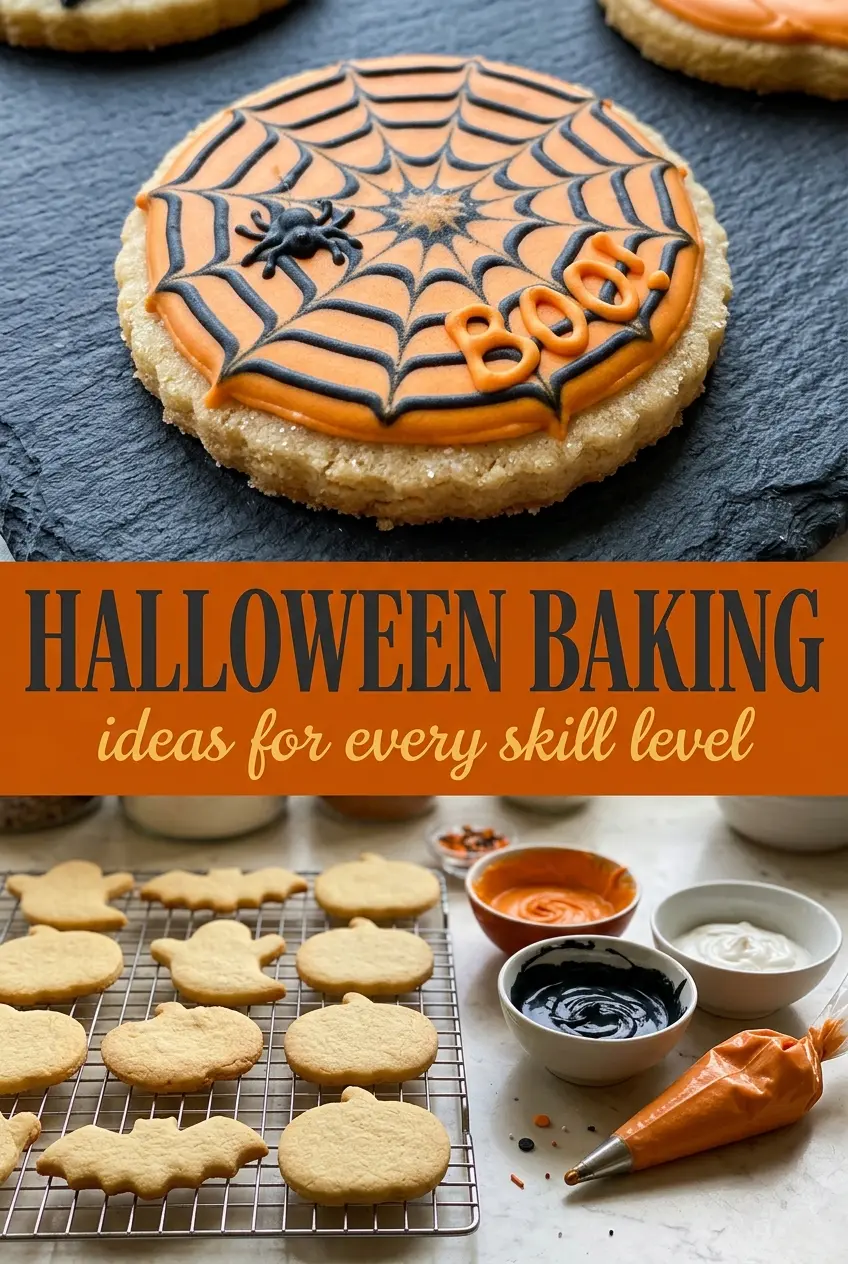
The dough rolled out cleanly after chilling, and the cookies kept their pumpkin and bat shapes without puffing all over the place. The royal icing dried hard enough that I could stack the cookies the next day with no smearing.
These Halloween cut-out cookies hold their shapes and decorate beautifully with orange and black royal icing.
The Real Trick Is Keeping the Shapes From Spreading
Halloween baking looks simple on the surface, but the difference between sharp little bats and a tray of misshapen blobs usually comes down to temperature and dough structure. Butter-based dough spreads when it gets too warm, so the chill time isn’t optional here. It firms the fat back up, which helps the cutouts keep their edges while they bake. If the dough starts sticking to the rolling pin or tearing when you lift it, it needs a few more minutes in the fridge.
The other place people run into trouble is the oven. Pull the cookies when the edges are just set, not when they’ve browned all over. That lighter bake keeps the centers tender and gives you a flat enough surface for icing. Overbaking adds color fast, but it also dries out the cookies and makes decorating less forgiving.
What Each Ingredient Is Actually Doing in This Halloween Dough
- All-purpose flour — This gives the dough enough structure to roll and cut cleanly without becoming tough. Too little flour and the shapes collapse; too much and the cookies bake up dry. Spoon it into the cup and level it off instead of packing it down.
- Baking powder — Just enough lift keeps the cookies from becoming dense bricks, but it doesn’t puff them so much that the shapes distort. If you skip it, the texture turns flatter and more compact.
- Unsalted butter — Butter is doing the flavor work and the tenderness work. It needs to be softened, not melted, so it creams properly with the sugar and traps air for a lighter crumb.
- Granulated sugar — This sweetens the dough and helps create that crisp edge. Creaming it with butter also matters for texture, because the tiny air pockets it creates help the cookies bake evenly.
- Egg and vanilla — The egg binds the dough, while vanilla rounds out the flavor so the cookies don’t taste flat under the icing. Use a real teaspoon of vanilla here; it’s one of the few places where a better bottle is worth it.
- Royal icing — This is what makes the Halloween decorations look neat instead of messy. It dries hard, which is why it works for outlining, flooding, and stacking. If you don’t want to make your own, a good powdered royal icing mix works fine.
Building the Dough, Baking the Shapes, and Decorating Without Smudges
Mix the dry ingredients first
Whisk the flour, baking powder, and salt together before they go anywhere near the butter. That keeps the leavening evenly distributed, so you don’t get random bubbles or uneven texture in the finished cookies. A quick whisk is enough; you’re not trying to aerate the flour, just blend it well.
Cream until the mixture looks lighter
Beat the butter and sugar until the mixture turns pale and fluffy, not just combined. That change in color and texture tells you air is getting into the dough, which gives the cookies a better bite. If the butter is too cold, the mixture will look grainy and resist blending, so let it soften at room temperature first.
Chill before you roll
Once the dough comes together, wrap it and chill it for about 30 minutes. That pause keeps the shapes from spreading and makes the dough easier to handle. If it’s still too soft after chilling, give it another 10 minutes instead of dusting in a lot of extra flour, which can make the cookies dry.
Watch the edges, not the clock
Bake the cutouts until the edges are just set and the centers still look a little pale. The cookies finish setting as they cool on the tray, so pulling them at the right moment keeps them tender. If they go too far in the oven, the icing will sit on a dry, crumbly surface instead of a smooth one.
Let the icing dry all the way through
Decorate after the cookies are completely cool, then let the icing dry undisturbed. Royal icing can look set on top while staying soft underneath, and that’s how you end up with smeared details when you stack them too soon. A full overnight dry is safest if you want clean layers or gift boxes.
Three Ways to Change the Bake Without Losing the Halloween Look
Gluten-Free Cutouts That Still Hold Shape
Use a 1:1 gluten-free baking flour with xanthan gum already included. The dough may need a slightly longer chill because gluten-free blends can feel softer, but the tradeoff is a cookie that still rolls and cuts well. Skip trying to add extra flour by feel, since that usually makes the texture sandy.
Dairy-Free Halloween Cookies
Swap the butter for a solid plant-based baking stick, not a tub spread. The stick-style versions behave more like real butter and help the cookies keep their edges. The flavor shifts slightly, but the decorating quality stays close to the original.
Chocolate Cocoa Version
Replace a small portion of the flour with unsweetened cocoa powder for a darker cookie that looks great under bright icing. Cocoa tightens the dough a bit, so expect a firmer finish and a deeper, less buttery flavor. It’s a nice swap when you want the shapes to stand out against orange and black decorations.
Storage and Reheating
- Refrigerator: Store decorated cookies in an airtight container for up to 5 days. If the icing is fully dry, layer with parchment so the decorations don’t rub.
- Freezer: Freeze the baked, undecorated cookies for up to 2 months. The icing freezes less reliably, so decorate after thawing for the cleanest finish.
- Reheating: These cookies don’t need reheating. If they’ve softened a bit in storage, let them sit uncovered for 10 to 15 minutes so the surfaces dry back out before serving.
Answers to the Questions Worth Asking
Halloween Baking
Ingredients
Equipment
Method
- Whisk together all-purpose flour, baking powder, and salt until evenly combined.
- Cream unsalted butter and granulated sugar until light and fluffy.
- Beat in the large egg and vanilla extract until the mixture is smooth and combined.
- Gradually mix in the dry ingredients until a soft dough forms.
- Chill the dough for 30 minutes until firm enough to roll.
- Roll out the dough and cut into Halloween shapes, placing them on a sheet pan.
- Bake at 350°F for 9-11 minutes until the edges are just set.
- Cool completely, then decorate with royal icing, colored orange and black.