
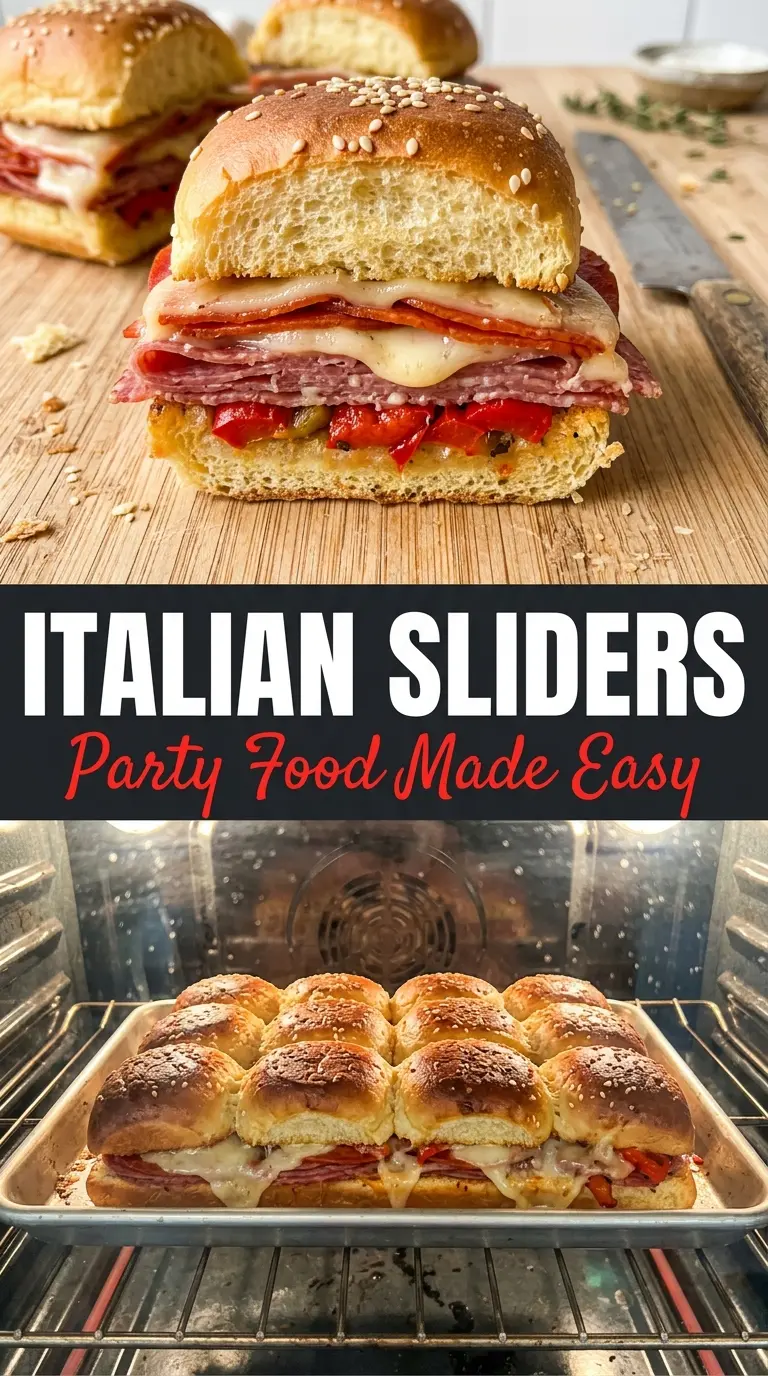
Golden Hawaiian roll tops, brushed with garlicky butter, bake up into the kind of party food that disappears before the pan even cools. The rolls stay soft underneath while the salami, pepperoni, ham, and provolone melt together into one salty, gooey layer with just enough tang from roasted red peppers and banana peppers to keep each bite from feeling heavy.
What makes these sliders work is the contrast. Hawaiian rolls bring sweetness, but they also keep their structure if you don’t overbake them. The meat and cheese go in stacked and snug so the heat can move through the whole pan evenly, and the butter topping does more than add flavor — it helps the tops turn glossy and deeply golden without drying out the bread. Covering the pan first traps steam so the cheese melts before the rolls get too much color.
Below, I’ll show you the small details that matter most, including how to keep the bottoms from getting soggy and how to make them ahead when you want one less thing to do before guests arrive.
The butter stayed on top of the rolls instead of soaking through, and the cheese melted into every layer. I added the banana peppers like you suggested, and the sliders had just enough bite to cut through all that salami and pepperoni.
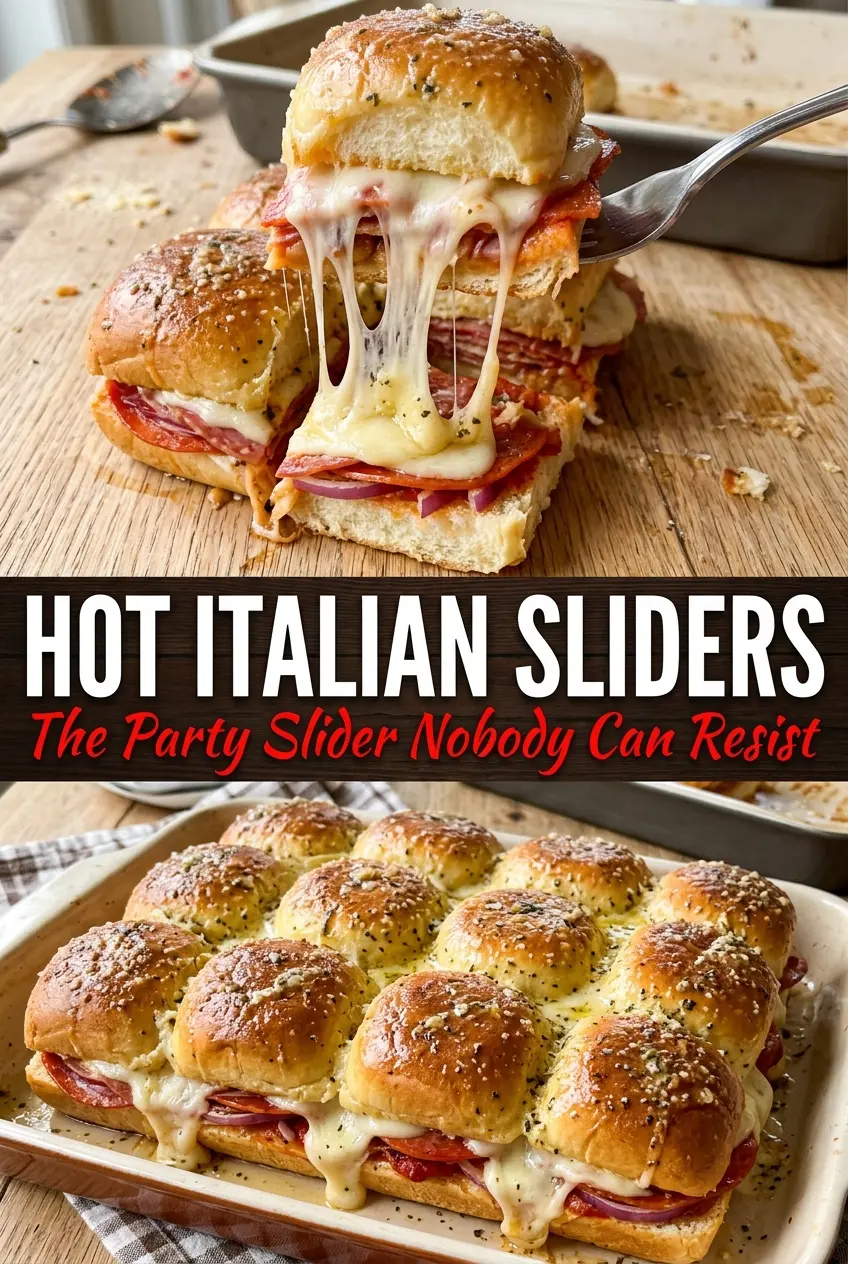
These Hot Italian Sub Sliders bake up with glossy butter tops, melted provolone, and that salty-sweet roll-and-meat combination that disappears fast at parties.
The trick to keeping these sliders from turning soggy in the middle
The biggest mistake with baked sliders is building them like a sandwich shop sub and expecting the oven to do the rest. Too much moisture in the filling, or butter brushed directly onto the cut rolls without any kind of barrier, can turn the bottom layer soft before the cheese has even had a chance to melt. Here, the order matters: the meats and cheese go in first, and the peppers stay tucked in where they add flavor without flooding the bread.
Covering the pan for the first bake is the other key move. That trapped steam melts the provolone and warms the meats through without blasting the tops too early. Then the final uncovered bake gives you the browned, buttery lid that pulls apart cleanly when you slice the pan.
What each layer is actually doing here
- Hawaiian sweet rolls — These are worth using because they hold together under heat better than they look like they should, and the slight sweetness balances the salty meat. Regular dinner rolls work in a pinch, but you’ll lose that sweet-savory contrast that makes the sliders taste finished.
- Salami, pepperoni, and ham — The mix gives you layered salt, spice, and a little extra heft instead of one flat deli note. If you only have one or two of these, use what you’ve got, but keep the total meat amount about the same so the sliders still feel full.
- Provolone — This is the cheese that melts into the meat without turning greasy. Mozzarella will melt, but it won’t give the same sharp, savory edge; Swiss will work if you want a nuttier finish.
- Roasted red peppers and banana peppers — The roasted peppers add softness and sweetness, while the banana peppers bring brightness and a little heat. If you skip both, the sliders lean heavier, so keep at least one of them in the mix.
- Butter, Italian seasoning, and garlic powder — This topping is what turns the rolls from ordinary to snackable. Melt the butter fully so the seasoning disperses evenly; if the garlic powder clumps, you’ll get uneven spots on the top instead of that even savory crust.
How to assemble and bake the pan so the tops brown before the bottoms soften
Setting the roll layer
Slice the rolls horizontally as one connected slab if you can, then set the bottoms into a greased 9×13 pan. Press them in gently so they sit flat, because any big gaps underneath will steam up unevenly and leave you with dry spots next to soggy ones. If the rolls are very tall, use a serrated knife and move slowly so you don’t tear the soft crumb.
Stacking the meats and cheese
Layer the salami, pepperoni, ham, provolone, and peppers in an even blanket. Don’t leave the center thinner than the edges; that’s how you end up with a pan that slices badly and tastes uneven from piece to piece. Put the tops back on and line them up so the pan bakes as one unit instead of a pile of loose sandwiches.
Finishing with the butter glaze
Mix the melted butter with the Italian seasoning and garlic powder, then brush it over the tops until every roll is coated. The butter should sit on the surface, not pool around the edges, so use a pastry brush or the back of a spoon and work from the center outward. Bake covered for 15 minutes, then uncover for the last 5 minutes until the tops are shiny and deep golden and the cheese is fully melted.
Three ways to adapt these Hot Italian Sub Sliders without losing what makes them good
Make them ahead for a party
Assemble the sliders the night before, cover the pan, and refrigerate it. Hold the butter topping until right before baking so the rolls don’t soak up all the fat overnight. Add a few extra minutes to the covered bake if the pan goes into the oven cold from the fridge.
Turn them into a lighter lunch version
Use turkey ham or all turkey deli meat and cut back slightly on the pepperoni. You’ll lose a little richness, but the peppers, provolone, and seasoned butter still keep the sliders satisfying. This works best when you want the same format without the heavier cured-meat edge.
Swap in gluten-free rolls
A sturdy gluten-free slider roll can work here if it’s one that toasts well. Brush lightly with butter and watch the uncovered finish closely, because gluten-free bread tends to brown fast once the moisture has cooked off. The texture won’t be as fluffy, but the filling still carries the whole dish.
Add more tang without making them wet
A thin layer of Italian dressing under the meat gives the sliders a sharper, more deli-style bite. Keep it light — a spoonful or two is enough — because too much dressing will soften the rolls before baking and blur the layers you worked to build.
Storage and Reheating
- Refrigerator: Store leftovers in an airtight container for up to 3 days. The rolls soften a bit, but the flavor holds up well.
- Freezer: Freeze fully baked sliders wrapped tightly for up to 2 months. Thaw in the refrigerator before reheating so the bread doesn’t dry out on the outside while the center is still cold.
- Reheating: Warm covered in a 325F oven until heated through, about 10 to 15 minutes depending on portion size. The common mistake is using the microwave, which turns the rolls chewy and the cheese greasy.
Questions I Get Asked About This Recipe
Hot Italian Sub Sliders
Ingredients
Equipment
Method
- Preheat oven to 350F and position a rack in the middle; heat until fully ready, about 10 minutes (visual cue: oven reaches temperature indicator).
- Slice the Hawaiian sweet rolls and place the bottoms in a greased 9x13 pan in a single even layer (visual cue: pan bottom is covered).
- Layer the salami, pepperoni, ham, provolone cheese, roasted red peppers, and banana peppers over the roll bottoms (visual cue: colorful peppers and cheese cover the meat).
- Place the roll tops back on to enclose the filling (visual cue: tops look level with no gaps).
- Mix melted butter with Italian seasoning and garlic powder, then brush over the roll tops thoroughly (visual cue: glossy, golden coating).
- Cover the pan with foil and bake at 350F for 15 minutes (visual cue: cheese softens and sides look lightly steamy).
- Uncover and bake at 350F for 5 more minutes until tops look deeper golden (visual cue: browned edges and bubbly provolone).
- Let cool briefly, then slice into sliders and serve warm (visual cue: clean slices hold their layers).