
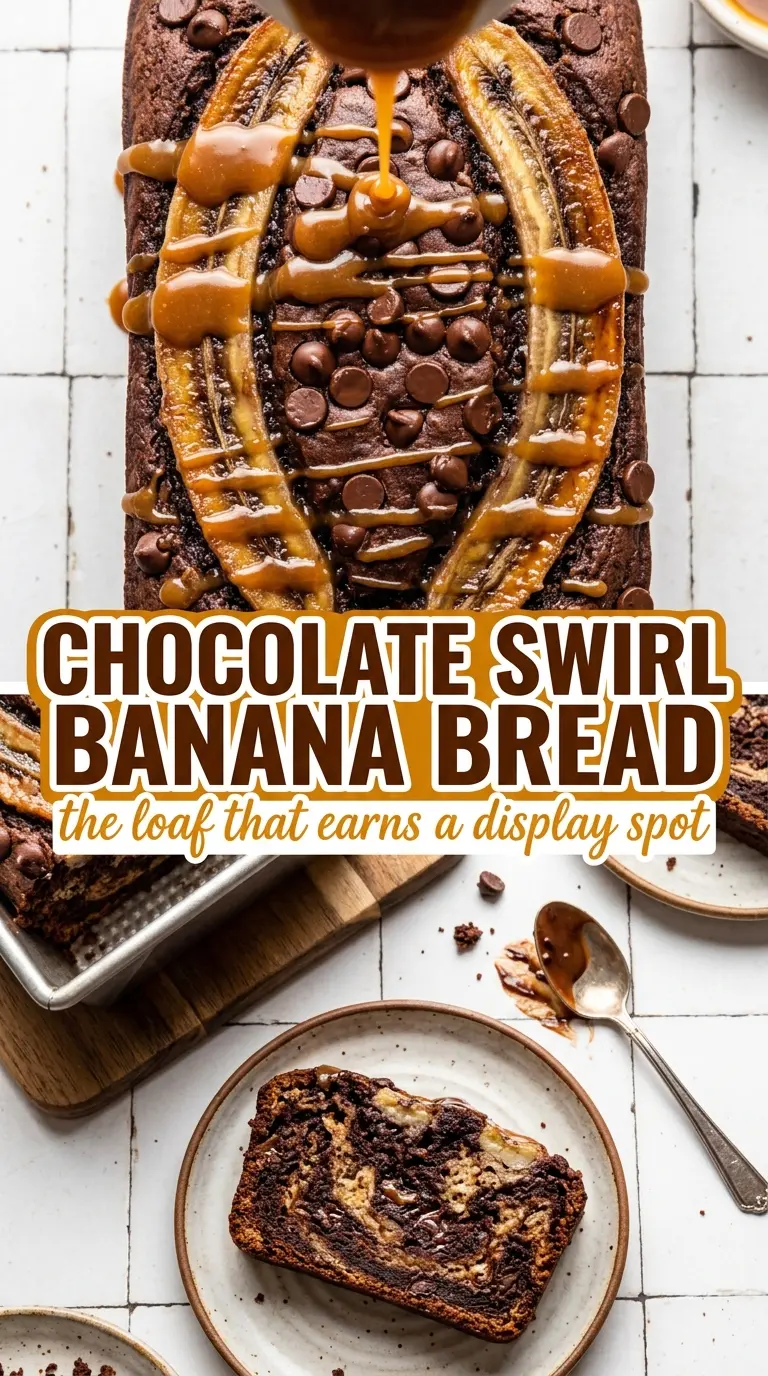
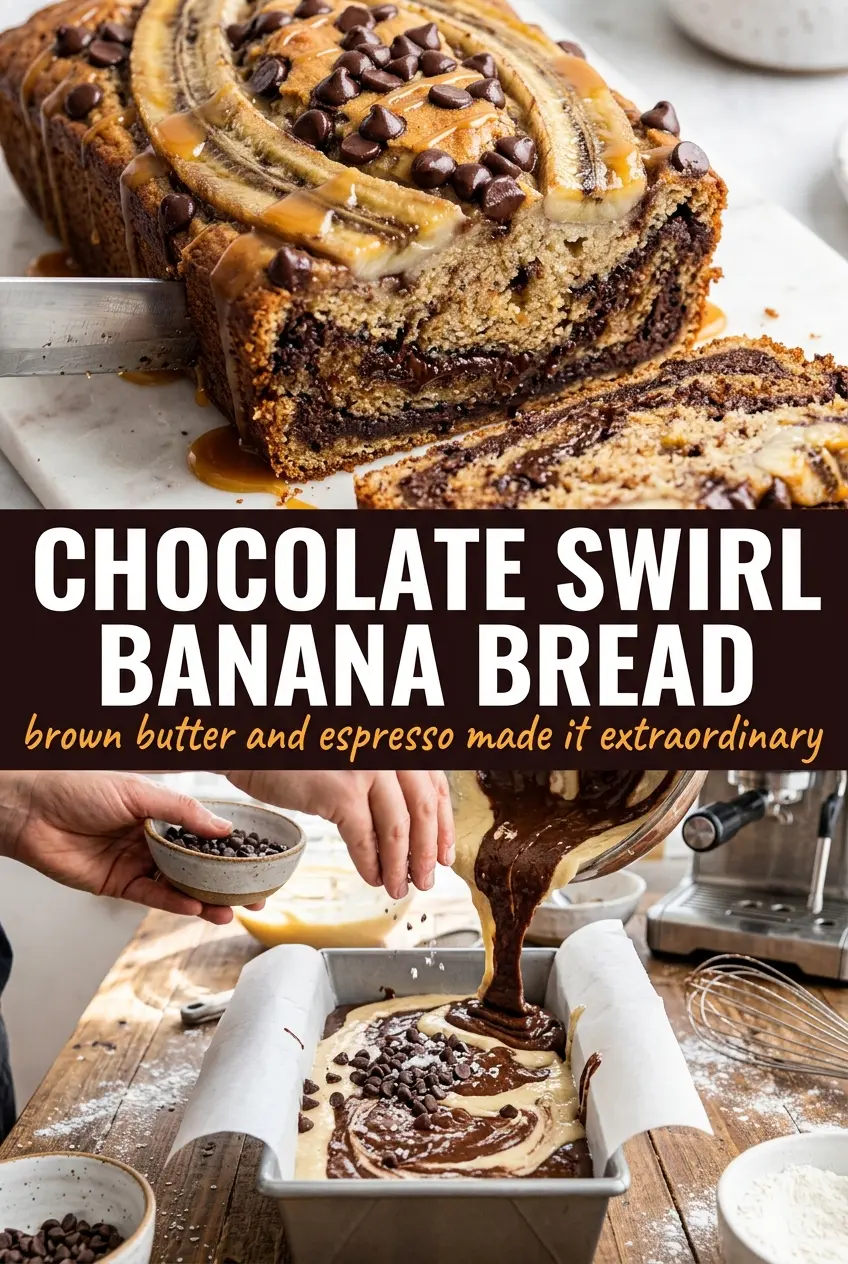
Swirled banana bread with brown butter, cocoa, and a salted caramel finish turns a familiar loaf into something that slices cleanly, smells incredible, and disappears fast. The contrast matters here: a tender vanilla-banana crumb on one side, a deep chocolate ribbon on the other, and those glossy banana halves on top that bake down into a caramelized lid. It looks dramatic, but it still eats like the banana bread people reach for on repeat.
The trick is keeping the base batter restrained. Brown butter brings nuttiness, espresso powder deepens the chocolate without making the loaf taste like coffee, and the bananas on top do more than decorate — they protect the surface a little and give you a soft, jammy top layer. The cocoa batter stays distinct if you stop mixing as soon as the flour disappears, and that’s what gives the finished loaf its bold marbled look instead of one muddy color.
Below, you’ll find the exact method for getting the swirl without overworking the batter, plus the small details that keep the caramel from sliding off the loaf while it’s still warm. There’s also a couple of smart variations if you want to shift this toward darker chocolate, skip the caramel, or make it fit what’s already in your pantry.
The swirl stayed distinct and the banana topping baked into this glossy, almost candied layer. I drizzled the caramel while it was still warm and it soaked into the top just enough without making the loaf soggy.
Save this swirled banana bread with brown butter, chocolate, and caramel for the day you want a loaf that looks bakery-made.
The Part Most Banana Breads Get Wrong: Too Much Mixing
Once flour goes into banana bread batter, every extra stir starts building gluten. That’s fine if you want a tighter, more bready slice, but it works against the soft crumb that makes banana bread worth baking in the first place. The goal here is a batter that looks a little uneven when you stop. That’s how you get a loaf that stays tender instead of turning dense and rubbery.
The second place people lose the loaf is in the swirl. If you chase the chocolate batter too aggressively with a knife, the two batters blend into one gray-brown mixture and the visual payoff disappears. A few lazy turns is enough. Think of it as moving the batter around, not mixing it together. The same idea applies to the banana halves on top: press them in lightly so they sit on the surface instead of sinking into the middle.
What Each Ingredient Is Actually Doing in This Dish
- Brown butter — This gives the loaf its nutty, toasted backbone. Melt it in a light-colored pan so you can see the milk solids turn amber. If you use regular melted butter, the bread still works, but it loses that deeper, almost caramel note.
- Very ripe bananas — Soft bananas with brown speckles mash smoothly and bring the moisture and sweetness this loaf needs. If yours are a little underripe, roast them at 300°F until the skins darken and the fruit softens.
- Espresso powder — You won’t taste coffee here. It sharpens the chocolate and makes the cocoa taste fuller. Instant coffee can stand in, but use half as much and expect a slightly less concentrated result.
- Dark cocoa powder — This is what gives the chocolate side its deep color and bold flavor. Natural cocoa works in a pinch, but the loaf will taste lighter and look less dramatic.
- Salted caramel — Drizzled at the end, it finishes the loaf with a glossy, slightly sticky top. Warm it just enough to pour cleanly. If it’s too hot, it runs straight off the sides.
Building the Loaf Without Losing the Swirl
Start with the brown butter and bananas
Brown the butter first and let it cool until it’s warm, not hot. If it’s still steaming when it hits the egg, you’ll end up with little bits of scrambled egg in the batter. Mash two bananas until mostly smooth, then stir in the brown butter, brown sugar, egg, vanilla, and espresso powder until the mixture looks glossy and loose.
Fold, don’t beat
Add the baking soda and salt first, then the flour, and stop mixing as soon as the dry streaks disappear. The batter should look thick and a little shaggy. If you keep stirring to make it silky, the loaf bakes up tough. At this stage, the batter’s texture matters more than its appearance.
Create the chocolate half
Divide the batter and stir the cocoa powder into one portion only. The chocolate side should turn dark and even, but it doesn’t need to be overworked. If you see a few streaks at the end, that’s fine — they disappear in the oven. What you don’t want is a batter so loose that the two halves mingle completely when you layer them.
Layer, swirl, and top
Spoon the plain and chocolate batters into the pan in alternating dollops, then drag a knife through the surface in slow figure-eights. Two or three passes is enough. Press the banana halves on top, flat sides up, so they hold their shape and brown on the surface. Scatter the chocolate chips over the top and bake until the center is set and a tester comes out with a few moist crumbs, not wet batter.
Finish while it’s warm
Let the loaf cool for a short stretch before drizzling on the caramel. Warm bread drinks in some of the caramel and stays glossy on top, but if it’s blazing hot, the caramel slips right off and pools in the pan. A warm loaf gives you the best middle ground: a shiny finish, a soft top, and slices that still hold together cleanly.
Three Ways to Tilt This Banana Bread Toward Your Pantry
Skip the caramel and keep it breakfast-friendly
Leave off the salted caramel and the loaf still tastes rich from the brown butter, chocolate, and ripe bananas. You lose the glossy bakery finish, but you gain a cleaner slice that works better for breakfast or lunchbox snacks.
Make it dairy-free
Swap the brown butter for a good dairy-free butter substitute and use a dairy-free chocolate chip. You won’t get the same nutty depth from browning real butter, but the banana, cocoa, and caramel notes still carry the loaf.
Push the chocolate side darker
Use an extra tablespoon of cocoa powder in the chocolate portion if you want a more dramatic contrast. The loaf will taste less sweet and a little more grown-up, and the swirl will stand out even more against the banana base.
Storage and Reheating
- Refrigerator: Store tightly wrapped for up to 4 days. The crumb gets a little denser in the fridge, but the flavor deepens.
- Freezer: This loaf freezes well without the caramel. Wrap slices individually and freeze for up to 2 months.
- Reheating: Warm slices in a 300°F oven for about 8 minutes or toast them lightly. Microwave reheating can make the swirl feel gummy, especially if the slice is thick.
Answers to the Questions Worth Asking
Banana Bread Recipe
Ingredients
Equipment
Method
- Preheat the oven to 350°F and grease a 9x5 loaf pan.
- Line a sheet pan with parchment if you want easier cleanup when the loaf bakes.
- Mash 2 bananas, then stir in cooled brown butter, brown sugar, egg, vanilla, and espresso powder until smooth.
- Stir in baking soda and salt, then fold in all-purpose flour until just combined, with no dry streaks.
- Remove half the batter to a separate bowl, then mix in dark cocoa powder until evenly colored.
- Alternate spoonfuls of plain and chocolate batter in the loaf pan, then swirl with a knife for a marbled pattern.
- Press the banana halves flat-side up on top, add chocolate chips, and bake for 55–65 min until a tester comes out with moist crumbs.
- Drizzle salted caramel over the warm loaf so it melts slightly and runs down the sides.