
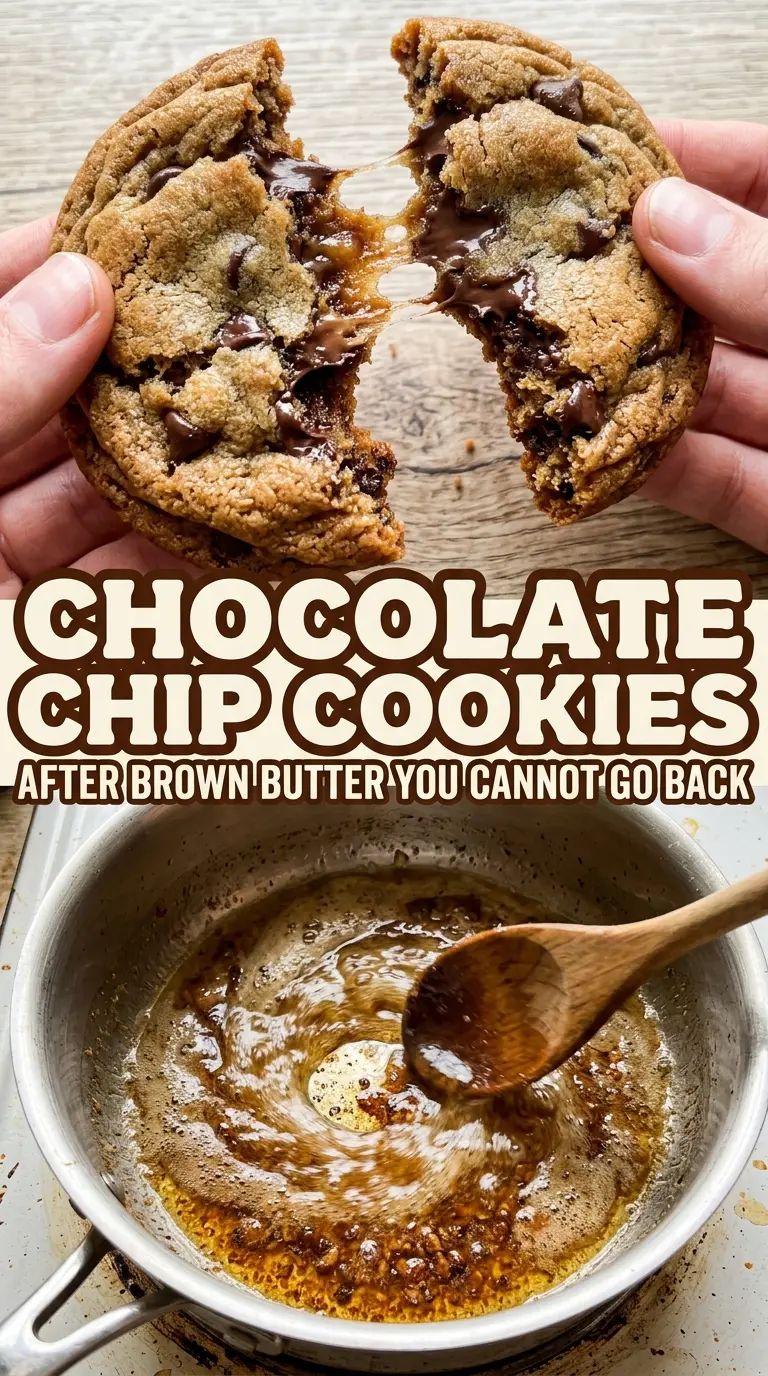
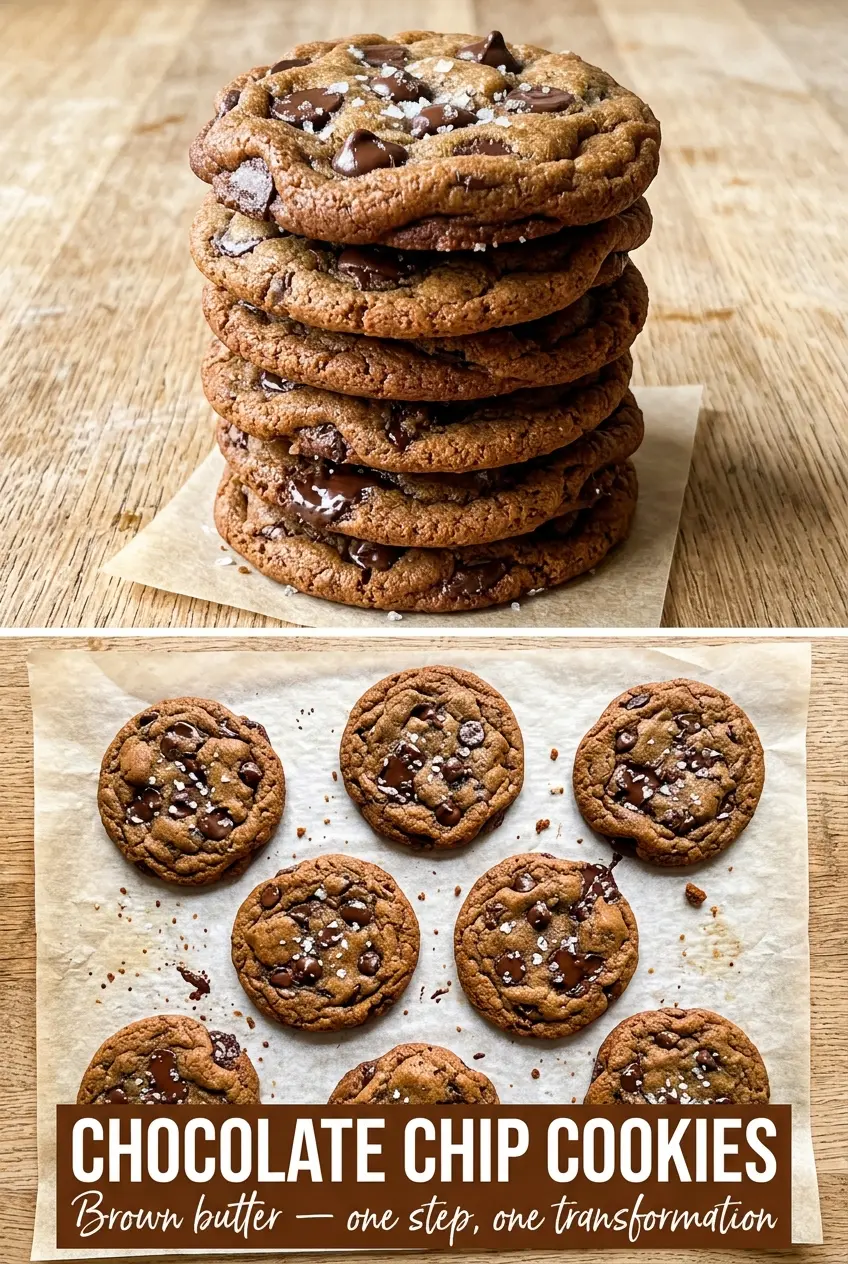
Brown butter chocolate chip cookies hit with a deeper, toastier flavor than the standard version, and the texture lands in that sweet spot between crisp edges and a chewy center. The first bite tastes familiar, then the browned butter shows up with a nutty, almost toffee-like note that makes the chocolate taste fuller and the brown sugar taste richer. A pinch of flaky salt on top keeps the sweetness from flattening out.
The browned butter matters here. When you cook off the water and toast the milk solids, you get flavor that plain melted butter can’t give you. Cooling it before mixing keeps the sugar from melting too soon, and chilling the dough helps the cookies bake up thicker instead of spreading into thin, greasy rounds. That short chill is the difference between a good cookie and one with the right texture at the center.
Below, I’m walking through the one part people usually rush, the ingredient that carries the most flavor, and the small timing details that keep these cookies from going from chewy to flat.
The browned butter gave these such a deep caramel flavor, and chilling the dough kept them from spreading all over the pan. Mine came out with crisp edges and a soft middle exactly like I wanted.
Save these brown butter chocolate chip cookies for the nights when you want chewy centers, crisp edges, and that nutty caramel note only browned butter can give.
The Reason Brown Butter Cookies Stay Chewy Instead of Spreading Flat
The biggest mistake with chocolate chip cookies is treating melted butter like softened butter and expecting the same result. Brown butter behaves differently because the milk solids have already toasted and the water content is lower, so the dough can loosen faster and spread more in the oven if you don’t chill it. That chill gives the flour time to hydrate and firms the fat back up before baking.
Another thing that matters here is the egg structure. Once the butter is browned and cooled, it can’t be beaten with the sugars while it’s hot or you’ll melt the sugar crystals and end up with a thinner dough. You want the mixture combined and glossy, not oily. If it starts looking greasy, it usually means the butter was still too warm.
- Browned butter — This is the whole point of the recipe. It brings the toffee-hazelnut flavor that makes these cookies taste deeper, not just sweeter.
- Brown sugar — Brown sugar helps hold moisture in the dough, which is why the centers stay chewy after the edges set.
- Flaky sea salt — Don’t skip it. The salt on top sharpens the chocolate and keeps the cookie from tasting one-note.
What Each Ingredient Is Doing in These Cookies
All-purpose flour gives the cookies enough structure to hold the browned butter and chocolate without turning cakey. If you measure it by scooping straight from the bag, you’ll often pack in too much and lose the chew, so a light spoon-and-level is the safer move.
Baking soda helps the cookies spread just enough and also supports browning. With browned butter already in the mix, it gives the cookies a little lift and keeps the texture from feeling dense.
Unsalted butter is worth using here because you’re controlling the salt yourself. Brown it slowly until the milk solids turn deep amber and smell nutty; if it smells burnt, the batch is gone. You can use salted butter in a pinch, but cut back the added salt so the finish doesn’t get harsh.
Granulated sugar and brown sugar work together for texture. White sugar helps with crisp edges, while brown sugar keeps the center soft and gives that deeper caramel note that fits the browned butter.
Eggs bind the dough and help create the chewy middle. Add them one at a time so the dough emulsifies instead of breaking.
Vanilla extract bridges the butter, sugar, and chocolate. It doesn’t need to be expensive, but it should taste clean and not flat.
Semi-sweet chocolate chips are the right balance here because the dough already brings a lot of caramelized flavor. Milk chocolate can tilt this too sweet, while darker chips make the salt pop more.
Building the Dough So It Bakes Thick and Chewy
Brown the Butter First
Melt the butter over medium heat and keep it moving until it foams, then starts to smell nutty and the bottom of the pan shows amber-brown specks. Those browned milk solids are where the flavor lives. Pull it off the heat as soon as it reaches that stage, because it can go from nutty to burnt fast. Pour it into a bowl right away so it stops cooking from the residual heat of the pan.
Cool It Before You Add Sugar
Let the browned butter sit until it’s warm, not hot. If you mix sugar into butter that’s still piping hot, the dough turns loose and the cookies spread too much in the oven. The butter should look golden and slightly thickened, with the browned bits settled at the bottom. That’s the point where it’s ready.
Chill the Finished Dough
Once the flour is mixed in and the chocolate chips are folded through, chill the dough for 30 minutes. That short rest firms the butter and gives the flour time to absorb moisture, which leads to thicker cookies with a better center. If you bake the dough immediately, expect wider cookies and softer edges. The dough should scoop cleanly and hold its shape on the tray.
Watch the Center, Not the Clock
Bake until the edges are set and golden, but the centers still look a touch underdone. They finish setting on the hot pan after you pull them from the oven, which is how you keep the middle chewy instead of dry. If you wait until the whole cookie looks firm, you’ve gone too far. A glossy center that no longer looks raw is the right target.
Three Ways to Adapt These Cookies Without Losing What Makes Them Good
Dairy-Free Version
Use a plant-based butter that browns well, not a soft tub spread. The flavor won’t be exactly the same, but you’ll still get good caramel notes if you cook it until it deepens in color and smells toasted. Keep the chill time, because dairy-free fats can spread even faster than regular butter.
Gluten-Free Swap
A good 1:1 gluten-free flour blend works here if it includes xanthan gum. The cookies will be a little more fragile when warm, but the browned butter and brown sugar still give you excellent chew once they cool. Let them sit on the pan for a few extra minutes before moving them.
Extra Chocolate, Less Sweet
Swap half the semi-sweet chips for chopped dark chocolate if you want sharper chocolate flavor and less sweetness. Chopped chocolate also creates little puddles that melt into the dough, which gives the cookies a bakery-style look. The texture stays the same, but the flavor gets more grown-up.
Storage and Reheating
- Refrigerator: Store baked cookies in an airtight container for up to 5 days. They soften a bit as they sit, which works nicely with the chewy center.
- Freezer: Freeze the scooped dough balls on a tray, then transfer them to a freezer bag for up to 2 months. Baked cookies also freeze well, but the dough freezes better because it bakes up fresher.
- Reheating: Warm a baked cookie in the microwave for 8 to 10 seconds, just until the chocolate softens. Too much heat makes the butter separate and the edges turn greasy.
Questions I Get Asked About This Recipe
Chocolate Chip Cookies
Ingredients
Equipment
Method
- Melt the browned butter in a saucepan over medium heat, swirling until golden-brown and nutty smelling, 5-7 min. Pour into a bowl and cool 20 min.
- Preheat the oven to 375°F.
- Beat the browned butter and both sugars until combined, scraping the pan as needed.
- Add the eggs one at a time, mixing after each addition until smooth.
- Add the vanilla extract and mix until incorporated.
- Whisk the flour, baking soda, and salt. Stir the dry mix into the butter mixture until no dry streaks remain.
- Fold in the semi-sweet chocolate chips until evenly distributed.
- Chill the dough for 30 min, until slightly firm.
- Drop rounded tablespoons of dough onto a baking sheet, spacing them apart.
- Sprinkle flaky sea salt over each dough portion so it clings to the tops.
- Bake at 375°F for 9-11 min, until the edges are set and the centers look lightly underbaked. Cool briefly on the pan before moving.